Node Manager is a WebLogic Server utility, independent of domains, that enables you to start, shut down, and restart Administration Server and Managed Server instances from a remote location. You can further use the Node Manager to control Administration Server and Managed Server from a local location also as I used in my case. Below post explains how you can start your Admin and Managed servers from the Node Manager.
Note : I have used Windows Vista OS and Oracle Database 11.2. All the commands for Linux/Unix will change accordingly.
Please follow the following steps for the same.
1.) Firstly configure the Node Manager
2.) Verify the Node Manager
3.) Once you verify and complete the above steps, I recommend, stop and close everything open till now. Then follow the following steps.
Start your Node Manager using <Middleware_Home>\wlserver_10.3\server\bin\startNodeManager.cmd command from the command prompt.
- Open a fresh command prompt window and run WLST.cmd from <Middleware_Home>\wlserver_10.3\common\bin\WLST.cmd.
- Next task is to connect to the Node Manager using nmConnect(). In the WLST console window type nmConnect('weblogic','welcome1','neeraj-pc','5556','soa_domain').
- Once connected to Node Manager the command prompt will change.
- Now to start your Admin server type nmStart() e.g. nmStart('AdminServer')
- To start your managed server type nmStart() e.g. nmStart('soa_server1')
- If it gives the success notification, you are done. Also, you can verify the same from the Weblogic Console.
After the Node Manager is properly configured, you can start the Node Manager by following the below mentioned steps.
- Open a new command window and go to <Middleware_Home>\wlserver_10.3\server\bin using cd command. Type startNodeManager and press Enter.
- It starts your Node Manager and gives the output as shown in below image.
- To verify if the Node Manager is running successfully, start your Admin Server if it is not Running and go to Weblogic Server Console.
- Navigate to Environment --> Machines --> LocalMachine --> Monitoring Tab --> Node Manager Status. It should display Reachable. See below image.
- Hence the Node Manager is running properly.
Before you can use the Node Manager utility, you need to configure/verify the Node Manager.
- For this start the Admin Server as usual by running the <Middleware_home>\user_projects\domains\soa_domain\startWebLogic.cmd.
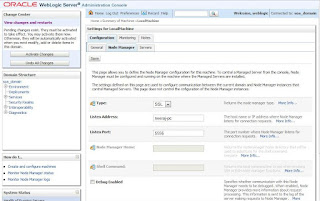
- Go to Weblogic Console and navigate to Machines-->LocalMachine-->Configuration Tab-->Node Manager Tab. Specify the ListenAddress (where Node Manager will run) and ListenPort as per you installation. By default the port is 5556. Be sure to provide the exact URL/Host name in ListenAddress as localhost will disallow starting the servers from remote location. See below image.

- Go to <Middleware_home>\wlserver_10.3\common\nodemanager\nodemanager.properties. Set StartScriptEnabled=true.
- Start WLST from <Middleware_home>\wlserver_10.3\common\bin\wlst.cmd in a separate command prompt window. You can double click on the wlst.cmd also to start WLST.
- Once WLST starts, connect to Admin Server from the WLST console. To connect type the connect() command on the WLST console and press Enter. Accept defaults or provide inputs as required. Once it connects successfully, the WLST prompt will change to wls:/mydomain/serverConfig>.
- Now type nmEnroll(<Middleware_home>\user_projects\domains\soa_domain). This command enrolls the current machine with the Node Manager and creates some properties file (nm_password.properties,SerializedSystemIni.dat).
- If the message displays as "Successfully enrolled this machine with the domain directory at", Enrollment is successful.
- Exit from the WLST console using the exit() command and shut down your Admin Server and Close the Browser Console window.
- Node Manager is configured. Further, to start the Admin and Managed Servers from this Node Manager, refer to this post.


